
本文最后更新于380 天前,其中的信息可能已经过时,如有错误请发送邮件到273925452@qq.com
文章目录[隐藏]

对应视频P25
测试板子:IMX6ull_pro
关于GPIO的操作,第一章有介绍。
程序和韦老师的源码一样,小鹿主要是加入了很多注释,便于理解😀
测试板子:IMX6ull_pro
关于GPIO的操作,第一章有介绍。
程序和韦老师的源码一样,小鹿主要是加入了很多注释,便于理解😀
GPIO子系统介绍
GPIO子系统
GPIO子系统是Linux内核的一部分,用于控制通用输入输出引脚的功能和状态。
GPIO引脚可以被配置为输入或输出,用于简单的数字信号交互,例如传感器的读取或LED的控制。
GPIO子系统的实现依赖于设备树,因为设备树包含了关于哪些引脚是GPIO以及它们的初始配置信息。
编写LED驱动的步骤
定义GPIO资源:
- 确定LED连接的GPIO引脚。
- 创建结构体来描述这些GPIO引脚。
初始化GPIO
- 请求GPIO资源。
- 设置GPIO的方向为输出。
实现读写操作
注册设备操作
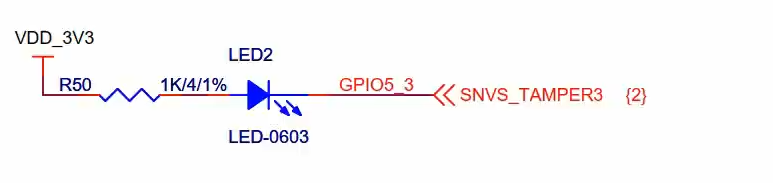
原理图
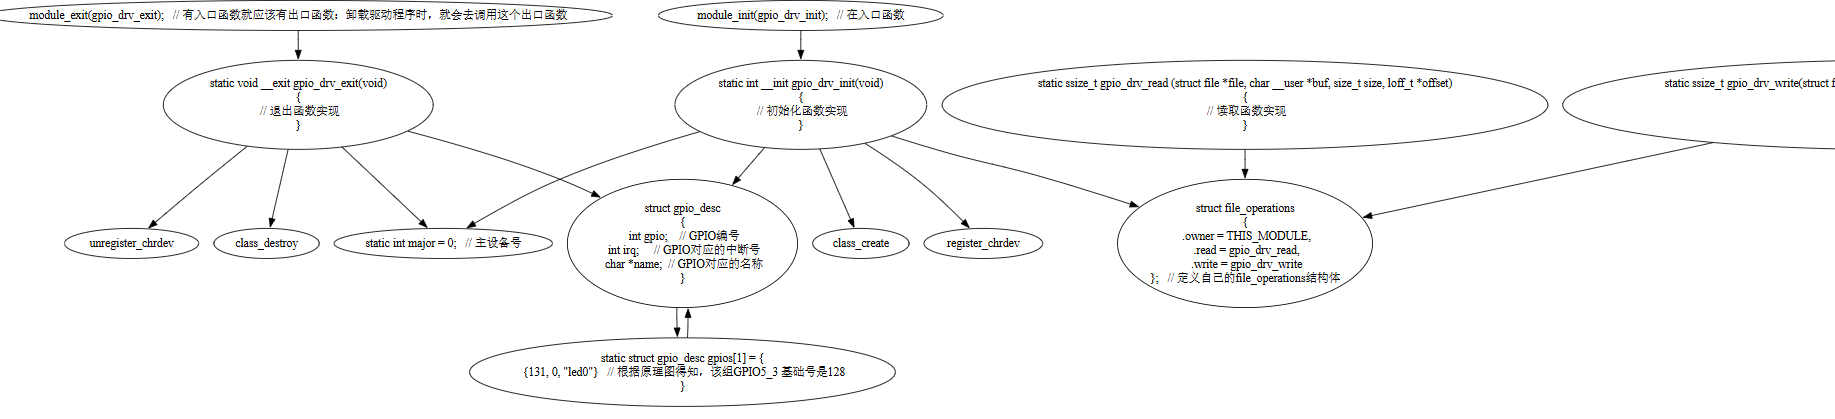
程序结构

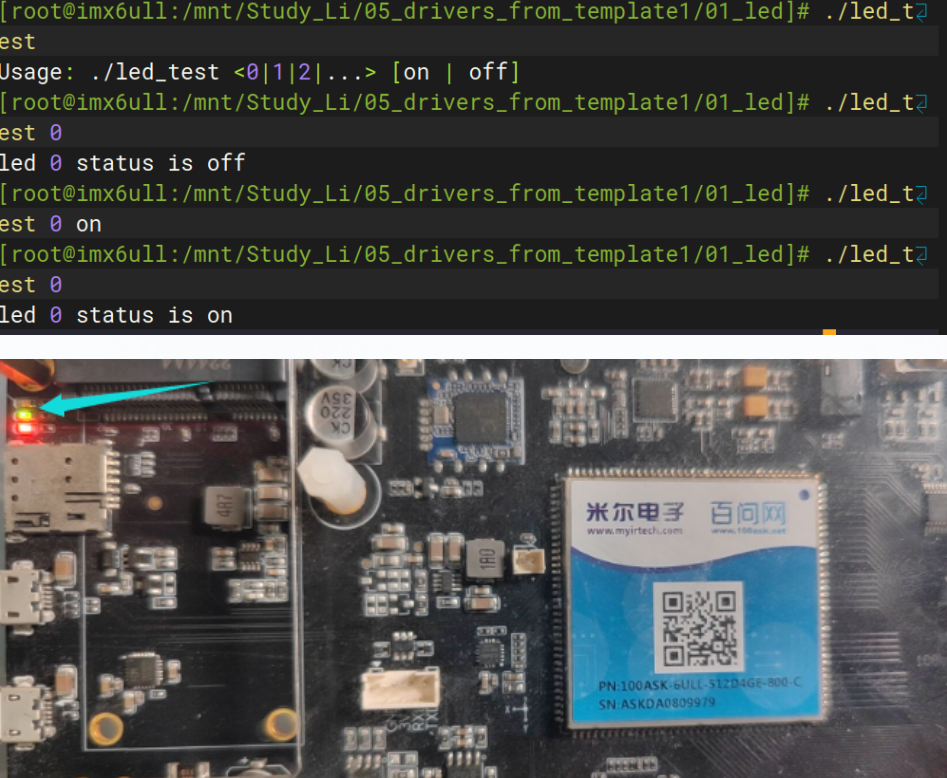
led.test.c
#include <stdlib.h>
#include <sys/types.h>
#include <sys/stat.h>
#include <fcntl.h>
#include <unistd.h>
#include <stdio.h>
#include <string.h>
#include <poll.h>
#include <signal.h>

static int fd;

//int led_on(int which);
//int led_off(int which);
//int led_status(int which);

/*
 * ./led_test <0|1|2|..>  on
 * ./led_test <0|1|2|..>  off
 * ./led_test <0|1|2|..>
 */
int main(int argc, char **argv)
{
    int ret;
    char buf[2];

    int i;

    /* 1. 判断参数 */
    if (argc < 2)
    {
        printf("Usage: %s <0|1|2|...> [on | off]\n", argv[0]);
        return -1;
    }

    /* 2. 打开文件 */
    fd = open("/dev/led", O_RDWR);
    if (fd == -1)
    {
        printf("can not open file /dev/led\n");
        return -1;
    }

    if (argc == 3)
    {

        /* write
        根据用户的输入
        使用strtol函数可以将字符串转换为整数,其中NULL表示不需要将转换的数字的终止位置指针返回,0表示按照十进制进行转换。
        */
        buf[0] = strtol(argv[1], NULL, 0);

        if (strcmp(argv[2], "on") == 0)
            buf[1] = 0;
        else
            buf[1] = 1;

        ret = write(fd, buf, 2);
    }
    else
    {
        buf[0] = strtol(argv[1], NULL, 0);
        ret = read(fd, buf, 2);
        if (ret == 2)  //驱动程序返回2表示读取成功
        {
            printf("led %d status is %s\n", buf[0], buf[1] == 0 ? "on" : "off");
        }
    }

    close(fd);

    return 0;
}

Code language: PHP (php)
led_drv.c
#include "asm-generic/errno-base.h"
#include "asm-generic/gpio.h"
#include "asm/uaccess.h"
#include <linux/module.h>
#include <linux/poll.h>

#include <linux/fs.h>
#include <linux/errno.h>
#include <linux/miscdevice.h>
#include <linux/kernel.h>
#include <linux/major.h>
#include <linux/mutex.h>
#include <linux/proc_fs.h>
#include <linux/seq_file.h>
#include <linux/stat.h>
#include <linux/init.h>
#include <linux/device.h>
#include <linux/tty.h>
#include <linux/kmod.h>
#include <linux/gfp.h>
#include <linux/gpio/consumer.h>
#include <linux/platform_device.h>
#include <linux/of_gpio.h>
#include <linux/of_irq.h>
#include <linux/interrupt.h>
#include <linux/irq.h>
#include <linux/slab.h>
#include <linux/fcntl.h>
#include <linux/timer.h>

/*定义gpio_desc 结构体*/
struct gpio_desc{
    //四个成员
    int gpio;    //gpio编号
    int irq;     // gpio对应的中断号
    char *name;  //gpio对应的名称
};

/*通过一个静态数组gpios初始化了两个gpio_desc结构体实例,分别对应GPIO引脚131和132*/
static struct gpio_desc gpios[1] = {
    {131, 0, "led0", },  //根据原理图得知,该组GPIO5_3 基础号是128
};

/* 主设备号                                                                 */
static int major = 0;
static struct class *gpio_class; // 创建gpio_class,声明了一个指向struct class类型的指针变量gpio_class。

/* 实现对应的open/read/write等函数,填入file_operations结构体                   */
static ssize_t gpio_drv_read (struct file *file, char __user *buf, size_t size, loff_t *offset)
{
    char tmp_buf[2];        //expected to read 2bytes
    int err;
    int count = sizeof(gpios)/sizeof(gpios[0]);  //number of reading devices

    if (size != 2)        //standardize user request format
        return -EINVAL;

    err = copy_from_user(tmp_buf, buf, 1);

    if (tmp_buf[0] >= count)   //check if the index exceeds
        return -EINVAL;

    tmp_buf[1] = gpio_get_value(gpios[tmp_buf[0]].gpio);  //读取IO口状态

    err = copy_to_user(buf, tmp_buf, 2);

    return 2;  //成功就返回2给应用程序
}

static ssize_t gpio_drv_write(struct file *file, const char __user *buf, size_t size, loff_t *offset)
{
    unsigned char ker_buf[2];
    int err;

    if (size != 2)
        return -EINVAL;

    err = copy_from_user(ker_buf, buf, size);

    if (ker_buf[0] >= sizeof(gpios)/sizeof(gpios[0]))
        return -EINVAL;

    gpio_set_value(gpios[ker_buf[0]].gpio, ker_buf[1]);
    return 2;
}

/* 定义自己的file_operations结构体                                              */
static struct file_operations gpio_led_drv = {
    .owner     = THIS_MODULE,
    .read    = gpio_drv_read,
    .write   = gpio_drv_write,
};

/* 在入口函数 */
static int __init gpio_drv_init(void)
{
    int err;        //error code
    int i;
    int count = sizeof(gpios)/sizeof(gpios[0]);   //number of elements

    printk("%s %s line %d\n", __FILE__, __FUNCTION__, __LINE__);

    for (i = 0; i < count; i++)
    {
        /* set pin as output */
        err = gpio_request(gpios[i].gpio, gpios[i].name);      //request GPIO
        if (err < 0) {
            printk("can not request gpio %s %d\n", gpios[i].name, gpios[i].gpio);
            return -ENODEV;
        }

        gpio_direction_output(gpios[i].gpio, 1);              //set pin as output  and hight level
    }

    /* 注册file_operations     */
    major = register_chrdev(0, "led", &gpio_led_drv);   /* /dev/gpio_desc */

    gpio_class = class_create(THIS_MODULE, "led_class");   //create class   //THIS_MODULE is a pointer to the current module
    if (IS_ERR(gpio_class)) {
        printk("%s %s line %d\n", __FILE__, __FUNCTION__, __LINE__);
        unregister_chrdev(major, "led_class");
        return PTR_ERR(gpio_class);
    }

    device_create(gpio_class, NULL, MKDEV(major, 0), NULL, "led"); /* /dev/led */

    return err;
}

/* 有入口函数就应该有出口函数:卸载驱动程序时,就会去调用这个出口函数
 */
static void __exit gpio_drv_exit(void)
{
    int i;
    int count = sizeof(gpios)/sizeof(gpios[0]);            //calculate the number of elements  //sizeof is operator

    printk("%s %s line %d\n", __FILE__, __FUNCTION__, __LINE__);

    device_destroy(gpio_class, MKDEV(major, 0));       //release device object
    class_destroy(gpio_class);                           //destruction equipment class
    unregister_chrdev(major, "led");               //unregister character device driver

    for (i = 0; i < count; i++)                       //release occupied GPIO resources
    {
        gpio_free(gpios[i].gpio);
    }
}

/* 7. 其他完善:提供设备信息,自动创建设备节点                                     */

module_init(gpio_drv_init);
module_exit(gpio_drv_exit);

MODULE_LICENSE("GPL");
Makefile
# 1. 使用不同的开发板内核时, 一定要修改KERN_DIR
# 2. KERN_DIR中的内核要事先配置、编译, 为了能编译内核, 要先设置下列环境变量:
# 2.1 ARCH,          比如: export ARCH=arm64
# 2.2 CROSS_COMPILE, 比如: export CROSS_COMPILE=aarch64-linux-gnu-
# 2.3 PATH,          比如: export PATH=$PATH:/home/book/100ask_roc-rk3399-pc/ToolChain-6.3.1/gcc-linaro-6.3.1-2017.05-x86_64_aarch64-linux-gnu/bin
# 注意: 不同的开发板不同的编译器上述3个环境变量不一定相同,
#       请参考各开发板的高级用户使用手册

KERN_DIR =  /home/book/100ask_imx6ull-sdk/Linux-4.9.88 # 板子所用内核源码的目录

all:
    make -C $(KERN_DIR) M=`pwd` modules
    $(CROSS_COMPILE)gcc -o led_test led_test.c
clean:
    make -C $(KERN_DIR) M=`pwd` modules clean
    rm -rf modules.order  led_test

# 参考内核源码drivers/char/ipmi/Makefile
# 要想把a.c, b.c编译成ab.ko, 可以这样指定:
# ab-y := a.o b.o
# obj-m += ab.o

obj-m += led_drv.o

Code language: PHP (php)
GPIO子系统的函数
GPIO子系统函数有新、老两套:
| descriptor-based(旧) | legacy(新) |
| 获得GPIO | |
| gpiod_get | gpio_request |
| gpiod_get_index | |
| gpiod_get_array | gpio_request_array |
| devm_gpiod_get | |
| devm_gpiod_get_index | |
| devm_gpiod_get_array | |
| 设置方向 | |
| gpiod_direction_input | gpio_direction_input |
| gpiod_direction_output | gpio_direction_output |
| 读值、写值 | |
| gpiod_get_value | gpio_get_value |
| gpiod_set_value | gpio_set_value |
| 释放GPIO | |
| gpio_free | gpio_free |
| gpiod_put | gpio_free_array |
| gpiod_put_array | |
| devm_gpiod_put | |
| devm_gpiod_put_array |
IMX6ULL_PRO上机
在Ubuntu编译成功
连接开发板,挂载文件系统,安装驱动,点灯成功


评论