
本文最后更新于378 天前,其中的信息可能已经过时,如有错误请发送邮件到273925452@qq.com
文章目录[隐藏]

GPIO 的地位跟其他模块,比如 I2C、UART 的地方是一样的,要使用某个引脚,需要先把引脚配置为 GPIO 功能,这要使用 Pinctrl 子系统,只需要在设备树里指定就可以。在驱动代码上不需要我们做任何事情。
GPIO 本身需要确定引脚,这也需要在设备树里指定。
GPIO 本身需要确定引脚,这也需要在设备树里指定。
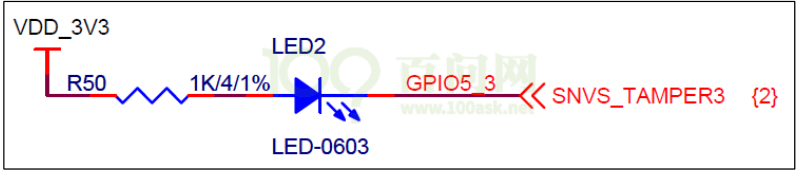
LED原理图
设备树生成工具i.MX Pins Tool v6
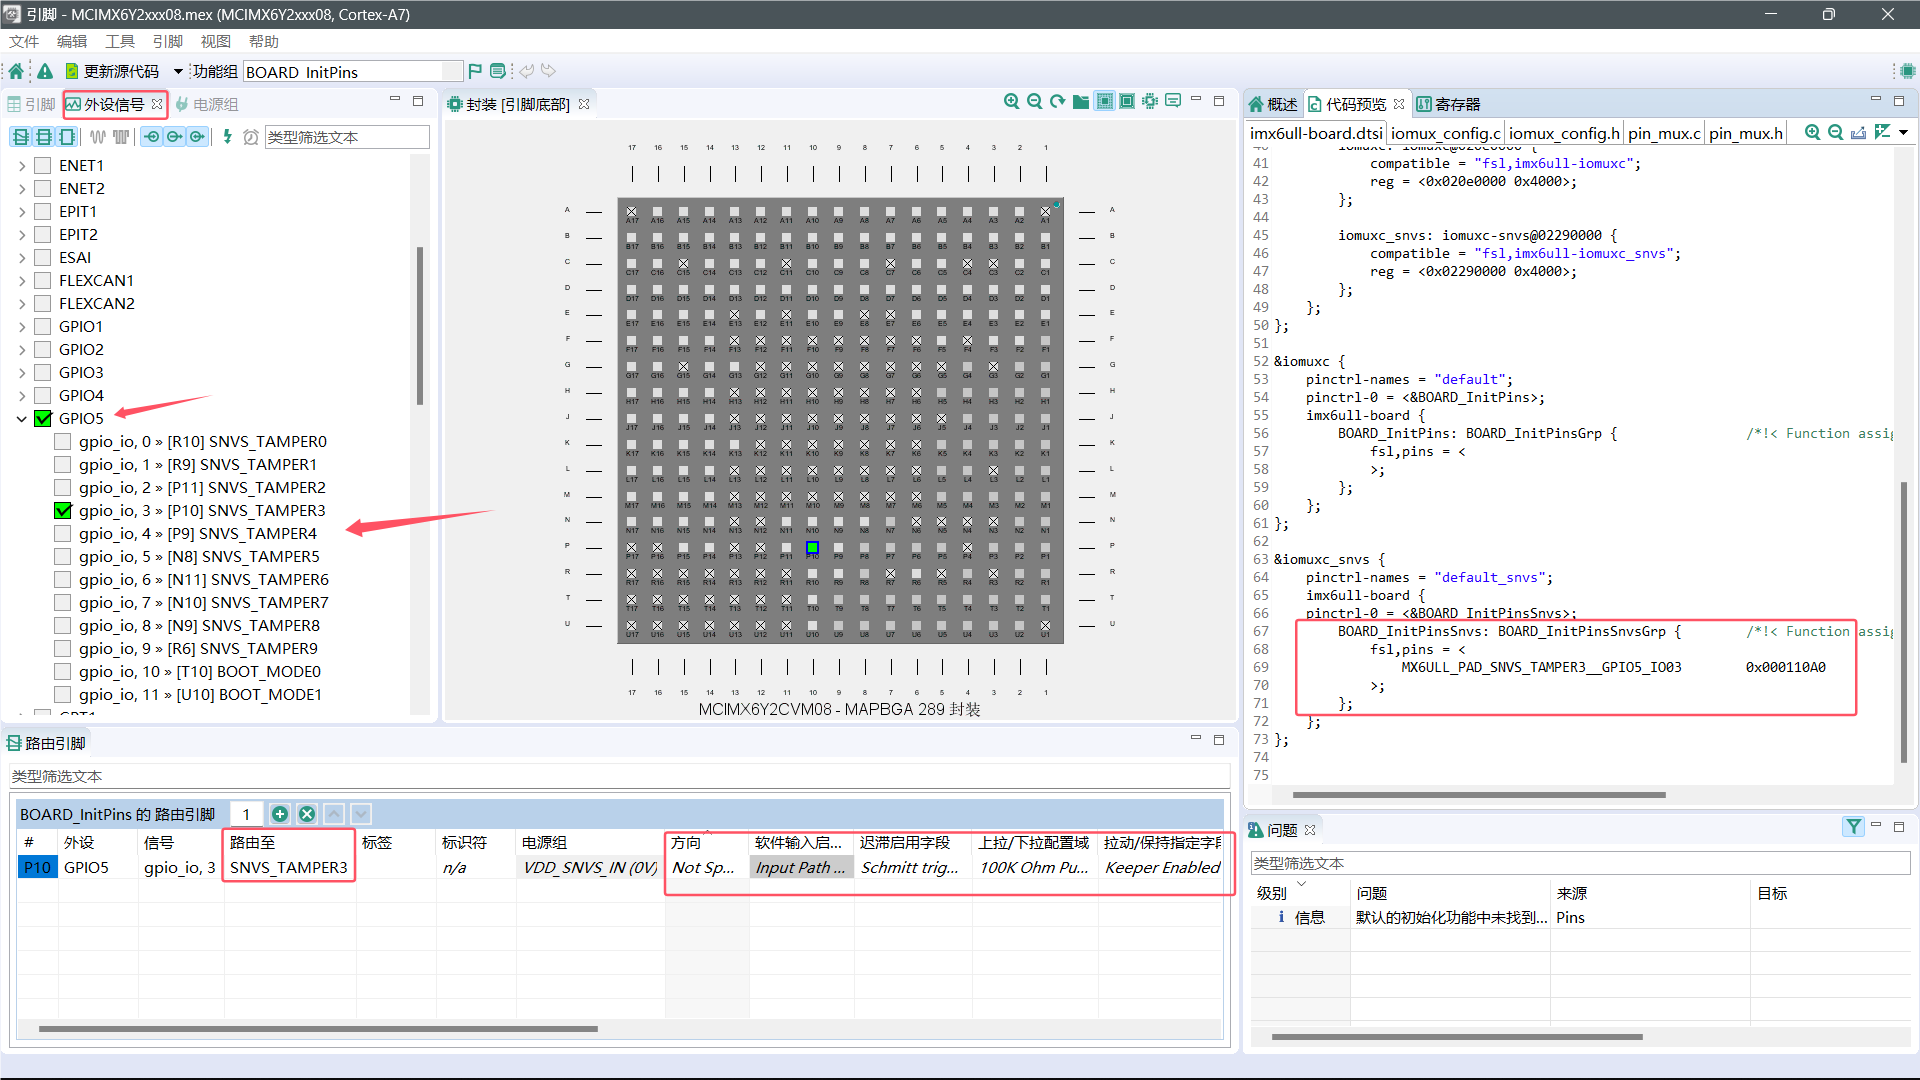
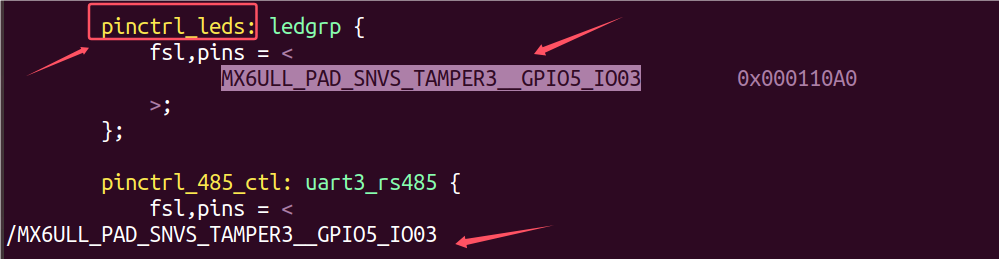
pinctrl_tsc_reset: tscresetgrp  {        /*!< Function assigned for the core: Cortex-A7[ca7] */
            fsl,pins = <
                MX6ULL_PAD_SNVS_TAMPER2__GPIO5_IO02        0x000110A0
            >;
        };
Code language: JavaScript (javascript)
在设备树中添加pin controller组
pin controller
1.路径:
vi /home/book/100ask_imx6ull-sdk/Linux-4.9.88/arch/arm/boot/dts/100ask_imx6ull-14×14.dts
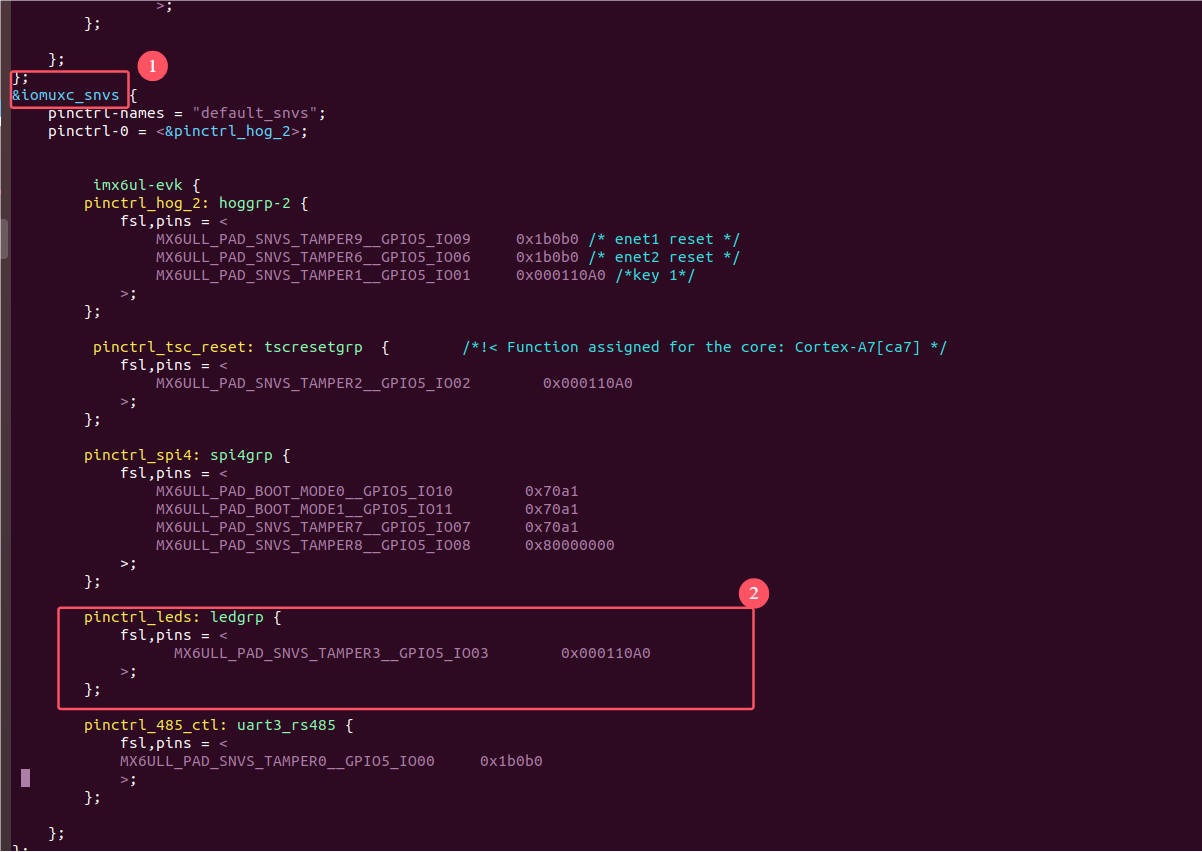
2.在设备树里面搜索(按下 / ): &iomuxc_snv
3.复制上面设备树工具生成的片段进去
vi /home/book/100ask_imx6ull-sdk/Linux-4.9.88/arch/arm/boot/dts/100ask_imx6ull-14×14.dts
2.在设备树里面搜索(按下 / ): &iomuxc_snv
3.复制上面设备树工具生成的片段进去
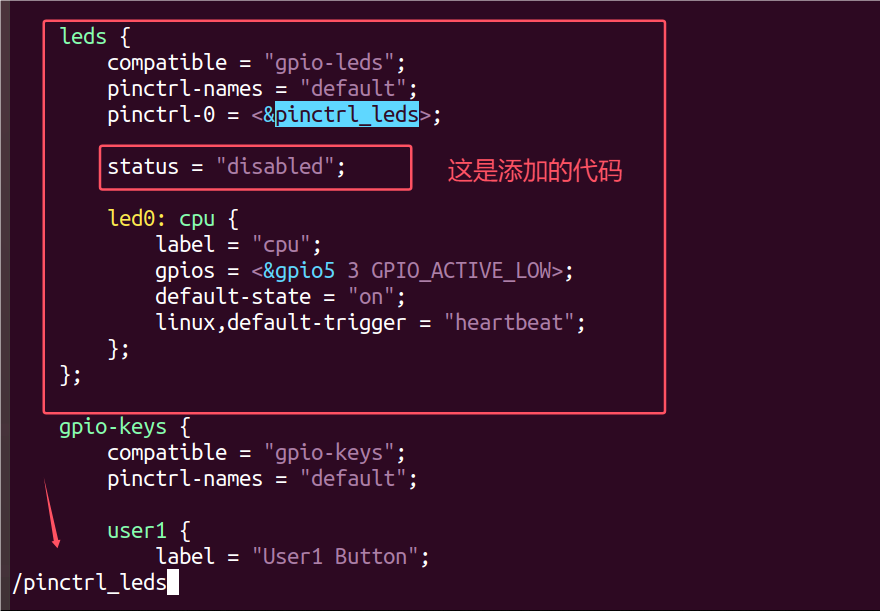
在设备树根目录下创建子节点
子节点
跳转到指定行数: 按下esc然后 按:1
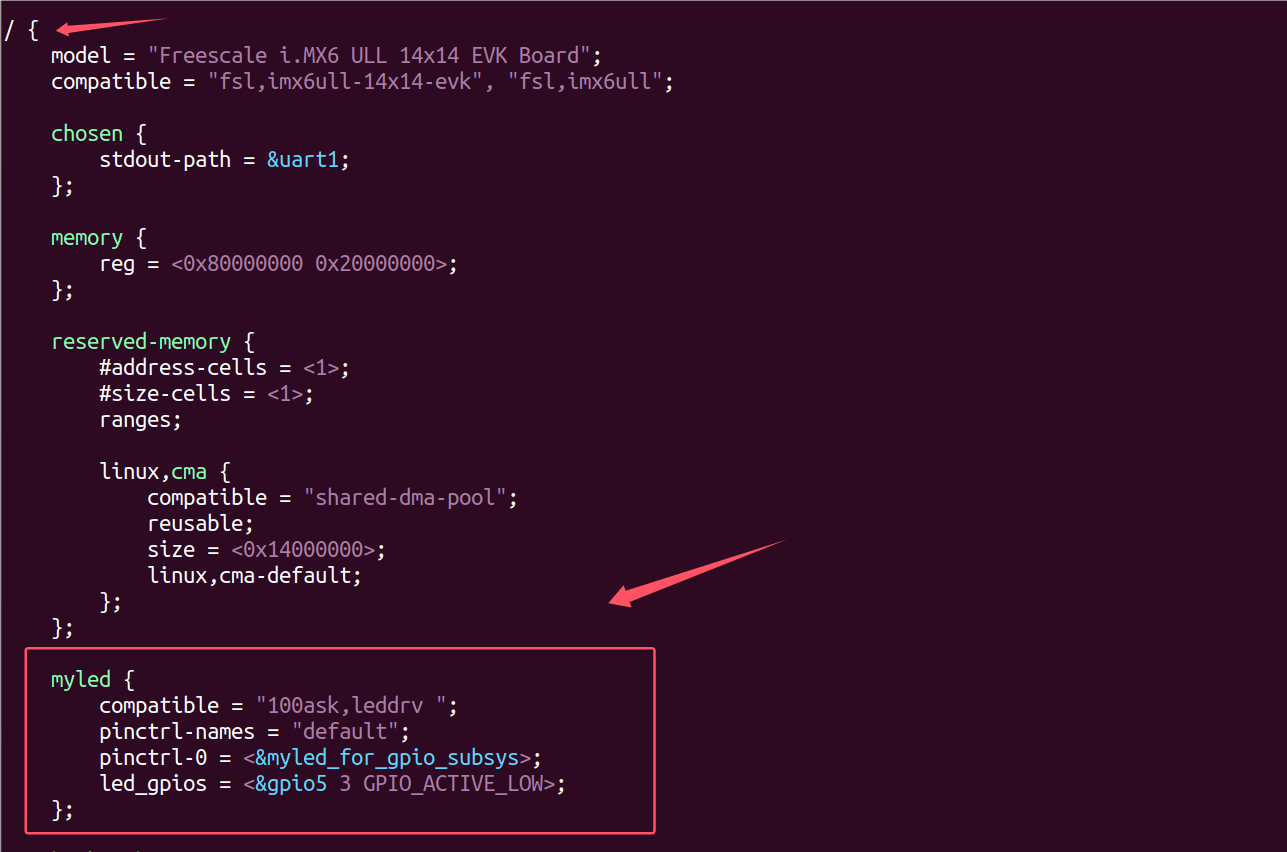
  myled{
        compatible = "100ask,leddrv" ;   //指定了设备与哪个驱动程序兼容,要与驱动程序里面对应
        pinctrl-names = "default";
        pinctrl-0 = <&pinctrl_leds>;     //指向了名为pinctrl_leds的pin controller配置组
        led-gpios = <&gpio5 3 GPIO_ACTIVE_LOW>;  //指定了与LED设备关联的GPIO线,这里的led是<label>,要与驱动程序里面对应
       };Code language: JavaScript (javascript)
注意
因为IMX6ULL_PRO已经使用GPIO5_3作为CPU指示灯,所以要找到该节点的地方去禁止掉
搜索: /MX6ULL_PAD_SNVS_TAMPER3__GPIO5_IO03得到CPU状态灯的子节点
搜索: /MX6ULL_PAD_SNVS_TAMPER3__GPIO5_IO03得到CPU状态灯的子节点
注意
在搜索: /pinctrl_leds
在里面添加 status = “disabled”;
按下ESC :wq (保存退出)
在里面添加 status = “disabled”;
按下ESC :wq (保存退出)
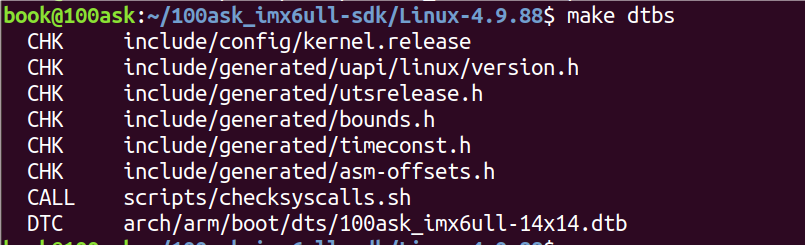
编译设备树
路径: /home/book/100ask_imx6ull-sdk/Linux-4.9.88
make dtbs
程序
leddrv.c
#include <linux/module.h>
#include <linux/platform_device.h>

#include <linux/fs.h>
#include <linux/errno.h>
#include <linux/miscdevice.h>
#include <linux/kernel.h>
#include <linux/major.h>
#include <linux/mutex.h>
#include <linux/proc_fs.h>
#include <linux/seq_file.h>
#include <linux/stat.h>
#include <linux/init.h>
#include <linux/device.h>
#include <linux/tty.h>
#include <linux/kmod.h>
#include <linux/gfp.h>
#include <linux/gpio/consumer.h>
#include <linux/of.h>
#include <linux/gpio.h>

/* 1. 确定主设备号                                                                 */
static int major = 0;
static struct class *led_class;
static struct gpio_desc *led_gpio;   //GPIO操作结构体指针
static int err_g = 0;

/* 设备名 设备类 设备节点全局变量 */
static const char *device_name = "100ask_led";           //字符设备名
static const char *class_name = "100ask_led_class";      //设备类名
static const char *device_node_pattern = "100ask_led0";   //设备节点

/* 3. 实现对应的open/read/write等函数,填入file_operations结构体                   */
static ssize_t led_drv_read (struct file *file, char __user *buf, size_t size, loff_t *offset)
{
    printk("%s %s line %d\n", __FILE__, __FUNCTION__, __LINE__);
    return 0;
}

/* write(fd, &val, 1); */
static ssize_t led_drv_write (struct file *file, const char __user *buf, size_t size, loff_t *offset)
{
    int err;
    char status;
    //struct inode *inode = file_inode(file);
    //int minor = iminor(inode);

    printk("%s %s line %d\n", __FILE__, __FUNCTION__, __LINE__);
    err = copy_from_user(&status, buf, 1);

    /* 根据次设备号和status控制LED */
    gpiod_set_value(led_gpio, status);

    return 1;
}

static int led_drv_open (struct inode *node, struct file *file)
{
    // int minor = iminor(node);

    printk("%s %s line %d\n", __FILE__, __FUNCTION__, __LINE__);
    /* 根据次设备号初始化LED */
    gpiod_direction_output(led_gpio, 1);  //根据原理图低电平亮

    return 0;
}

static int led_drv_close (struct inode *node, struct file *file)
{
    printk("%s %s line %d\n", __FILE__, __FUNCTION__, __LINE__);
    return 0;
}

/* 定义自己的file_operations结构体                                              */
static struct file_operations led_drv = {
    .owner     = THIS_MODULE,
    .open    = led_drv_open,
    .read    = led_drv_read,
    .write   = led_drv_write,
    .release = led_drv_close,
};

/* 4. 从platform_device获得GPIO
 *    把file_operations结构体告诉内核:注册驱动程序
 */static int chip_demo_gpio_probe(struct platform_device *pdev)
{
    //int err;
    err_g = 1;

    /* 4.1 设备树中定义有: led-gpios=<...>;    */
    /*
        该行代码的作用:从设备树中获取与 pdev 关联的设备上的 "led" GPIO 线。
        &pdev->dev: 指向 struct device 结构体的指针,这个结构体描述了一个设备
        gpiod_get():从设备树(Device Tree)中查找并获取一个 GPIO 控制器上的 GPIO 线。
    */
    led_gpio = gpiod_get(&pdev->dev, "led", 0);  //"led"对应设备树里面的<label>
    if (IS_ERR(led_gpio)) {
        dev_err(&pdev->dev, "Failed to get GPIO for led\n");
        err_g = 2;
        return PTR_ERR(led_gpio);

    }

    /* 4.2 注册file_operations     */
    major = register_chrdev(0, device_name, &led_drv); /* /dev/100ask_led0 */

    led_class = class_create(THIS_MODULE, class_name);
    if (IS_ERR(led_class))
    {
        printk("%s %s line %d\n", __FILE__, __FUNCTION__, __LINE__);
        unregister_chrdev(major, "led"); // 卸载驱动
        gpiod_put(led_gpio);             // 释放GPIO
        err_g = 3;
        return PTR_ERR(led_class);

    }

    /* /dev/100ask_led */
    device_create(led_class, NULL, MKDEV(major, 0), NULL, device_node_pattern);

    return 0;

}

static int chip_demo_gpio_remove(struct platform_device *pdev)
{
    device_destroy(led_class, MKDEV(major, 0));
    class_destroy(led_class);
    unregister_chrdev(major, device_name);
    gpiod_put(led_gpio);

    return 0;
}

/* 定义设备树匹配表,用于识别和支持特定的LED驱动器 */
static const struct of_device_id ask100_leds[] = {
    /* 匹配字符串 "100ask,leddrv" 用于标识100ASK系列LED驱动器 */
    { .compatible = "100ask,leddrv" },
    /* 空项作为匹配表的结束标志 */
    { },
};

/* 1. 定义platform_driver */
/* 定义一个平台驱动结构体,用于LED芯片的演示 */
static struct platform_driver chip_demo_gpio_driver = {
    /* 设置探测函数,当设备被探测到时调用 */
    .probe = chip_demo_gpio_probe,
    /* 设置移除函数,当设备被移除时调用 */
    .remove = chip_demo_gpio_remove,
    /* 设置<驱动程序的名称>和<设备树匹配表> */
    .driver = {
        /* 设置驱动程序的名称 */
        .name = "100ask_led", // 字符设备名
    /* 设置设备树匹配表,用于设备的匹配 */
        .of_match_table = ask100_leds,
    },
};

/* 2. 在入口函数注册platform_driver */
static int __init led_init(void)
{
    int err;
    err = platform_driver_register(&chip_demo_gpio_driver);

    printk("__FILE__:%s line:%d  err:%d led_class:%d err_g:%d\n", __FILE__, __LINE__, err,led_class,err_g);

    return err;
}

/* 3. 有入口函数就应该有出口函数:卸载驱动程序时,就会去调用这个出口函数
 *     卸载platform_driver
 */
static void __exit led_exit(void)
{
    printk("%s %s line %d\n", __FILE__, __FUNCTION__, __LINE__);
    device_destroy(led_class, MKDEV(major, 0));
    class_destroy(led_class);
    unregister_chrdev(major, "100ask_led");
    gpiod_put(led_gpio);

    platform_driver_unregister(&chip_demo_gpio_driver);
}

/* 7. 其他完善:提供设备信息,自动创建设备节点                                     */

module_init(led_init);
module_exit(led_exit);

MODULE_LICENSE("GPL");

Code language: HTML, XML (xml)
ledtest.c
#include <sys/types.h>
#include <sys/stat.h>
#include <fcntl.h>
#include <unistd.h>
#include <stdio.h>
#include <string.h>

/*
 * ./ledtest /dev/100ask_led0 on
 * ./ledtest /dev/100ask_led0 off
 */
int main(int argc, char **argv)
{
    int fd;
    char status;

    /* 1. 判断参数 */
    if (argc != 3)
    {
        printf("Usage: %s <dev> <on | off>\n", argv[0]);
        return -1;
    }

    /* 2. 打开文件 */
    fd = open(argv[1], O_RDWR);
    if (fd == -1)
    {
        printf("can not open file %s\n", argv[1]);
        return -1;
    }

    /* 3. 写文件 */
    if (0 == strcmp(argv[2], "on"))
    {
        status = 1;
        write(fd, &status, 1);
    }
    else
    {
        status = 0;
        write(fd, &status, 0);
    }

    close(fd);

    return 0;
}

<article data-content='[{"type":"block","id":"P8Ij-1721391681443","name":"code","data":{"wrap":false,"language":"c","theme":"default"},"nodes":[{"type":"block","id":"9dNy-1721391681442","name":"code-line","data":{},"nodes":[{"type":"text","id":"Qgu0-1721391681441","leaves":[{"text":"\r","marks":[]}]}]},{"type":"block","id":"kmWE-1721393831635","name":"code-line","data":{},"nodes":[{"type":"text","id":"0OPO-1721393831634","leaves":[{"text":"#include <sys/types.h>\r","marks":[]}]}]},{"type":"block","id":"FqBj-1721393831637","name":"code-line","data":{},"nodes":[{"type":"text","id":"0J9W-1721393831636","leaves":[{"text":"#include <sys/stat.h>\r","marks":[]}]}]},{"type":"block","id":"tjYq-1721393831639","name":"code-line","data":{},"nodes":[{"type":"text","id":"78CF-1721393831638","leaves":[{"text":"#include <fcntl.h>\r","marks":[]}]}]},{"type":"block","id":"kEri-1721393831641","name":"code-line","data":{},"nodes":[{"type":"text","id":"qYet-1721393831640","leaves":[{"text":"#include <unistd.h>\r","marks":[]}]}]},{"type":"block","id":"BcuY-1721393831643","name":"code-line","data":{},"nodes":[{"type":"text","id":"aJZv-1721393831642","leaves":[{"text":"#include <stdio.h>\r","marks":[]}]}]},{"type":"block","id":"dOfe-1721393831645","name":"code-line","data":{},"nodes":[{"type":"text","id":"zJlP-1721393831644","leaves":[{"text":"#include <string.h>\r","marks":[]}]}]},{"type":"block","id":"WdjB-1721393831647","name":"code-line","data":{},"nodes":[{"type":"text","id":"qF1W-1721393831646","leaves":[{"text":"\r","marks":[]}]}]},{"type":"block","id":"LHbD-1721393831649","name":"code-line","data":{},"nodes":[{"type":"text","id":"iPzf-1721393831648","leaves":[{"text":"/*\r","marks":[]}]}]},{"type":"block","id":"mFIT-1721393831651","name":"code-line","data":{},"nodes":[{"type":"text","id":"qafd-1721393831650","leaves":[{"text":" * ./ledtest /dev/100ask_led0 on\r","marks":[]}]}]},{"type":"block","id":"4V4z-1721393831653","name":"code-line","data":{},"nodes":[{"type":"text","id":"RvNf-1721393831652","leaves":[{"text":" * ./ledtest /dev/100ask_led0 off\r","marks":[]}]}]},{"type":"block","id":"3rub-1721393831655","name":"code-line","data":{},"nodes":[{"type":"text","id":"th9K-1721393831654","leaves":[{"text":" */\r","marks":[]}]}]},{"type":"block","id":"NlxJ-1721393831657","name":"code-line","data":{},"nodes":[{"type":"text","id":"IXNS-1721393831656","leaves":[{"text":"int main(int argc, char **argv)\r","marks":[]}]}]},{"type":"block","id":"E1Am-1721393831659","name":"code-line","data":{},"nodes":[{"type":"text","id":"T8Cj-1721393831658","leaves":[{"text":"{\r","marks":[]}]}]},{"type":"block","id":"M96r-1721393831661","name":"code-line","data":{},"nodes":[{"type":"text","id":"JcFB-1721393831660","leaves":[{"text":"\tint fd;\r","marks":[]}]}]},{"type":"block","id":"U72V-1721393831663","name":"code-line","data":{},"nodes":[{"type":"text","id":"JDxy-1721393831662","leaves":[{"text":"\tchar status;\r","marks":[]}]}]},{"type":"block","id":"UICX-1721393831665","name":"code-line","data":{},"nodes":[{"type":"text","id":"7FIE-1721393831664","leaves":[{"text":"\t\r","marks":[]}]}]},{"type":"block","id":"ecQb-1721393831667","name":"code-line","data":{},"nodes":[{"type":"text","id":"ABJs-1721393831666","leaves":[{"text":"\t/* 1. 判断参数 */\r","marks":[]}]}]},{"type":"block","id":"LqcS-1721393831669","name":"code-line","data":{},"nodes":[{"type":"text","id":"MOzw-1721393831668","leaves":[{"text":"\tif (argc != 3) \r","marks":[]}]}]},{"type":"block","id":"scBv-1721393831671","name":"code-line","data":{},"nodes":[{"type":"text","id":"2hxx-1721393831670","leaves":[{"text":"\t{\r","marks":[]}]}]},{"type":"block","id":"NnKK-1721393831673","name":"code-line","data":{},"nodes":[{"type":"text","id":"iVnM-1721393831672","leaves":[{"text":"\t\tprintf(\"Usage: %s <dev> <on | off>\\n\", argv[0]);\r","marks":[]}]}]},{"type":"block","id":"Yle0-1721393831675","name":"code-line","data":{},"nodes":[{"type":"text","id":"qOOA-1721393831674","leaves":[{"text":"\t\treturn -1;\r","marks":[]}]}]},{"type":"block","id":"WY0g-1721393831677","name":"code-line","data":{},"nodes":[{"type":"text","id":"MxvF-1721393831676","leaves":[{"text":"\t}\r","marks":[]}]}]},{"type":"block","id":"BsLR-1721393831679","name":"code-line","data":{},"nodes":[{"type":"text","id":"jzEL-1721393831678","leaves":[{"text":"\r","marks":[]}]}]},{"type":"block","id":"juOE-1721393831681","name":"code-line","data":{},"nodes":[{"type":"text","id":"BgD7-1721393831680","leaves":[{"text":"\t/* 2. 打开文件 */\r","marks":[]}]}]},{"type":"block","id":"qoHx-1721393831684","name":"code-line","data":{},"nodes":[{"type":"text","id":"9h2G-1721393831683","leaves":[{"text":"\tfd = open(argv[1], O_RDWR);\r","marks":[]}]}]},{"type":"block","id":"6AdP-1721393831686","name":"code-line","data":{},"nodes":[{"type":"text","id":"RfSv-1721393831685","leaves":[{"text":"\tif (fd == -1)\r","marks":[]}]}]},{"type":"block","id":"U7Cx-1721393831688","name":"code-line","data":{},"nodes":[{"type":"text","id":"kYdL-1721393831687","leaves":[{"text":"\t{\r","marks":[]}]}]},{"type":"block","id":"xPcs-1721393831690","name":"code-line","data":{},"nodes":[{"type":"text","id":"tihz-1721393831689","leaves":[{"text":"\t\tprintf(\"can not open file %s\\n\", argv[1]);\r","marks":[]}]}]},{"type":"block","id":"gn77-1721393831692","name":"code-line","data":{},"nodes":[{"type":"text","id":"XiBq-1721393831691","leaves":[{"text":"\t\treturn -1;\r","marks":[]}]}]},{"type":"block","id":"vj3u-1721393831694","name":"code-line","data":{},"nodes":[{"type":"text","id":"riyp-1721393831693","leaves":[{"text":"\t}\r","marks":[]}]}]},{"type":"block","id":"TDHO-1721393831696","name":"code-line","data":{},"nodes":[{"type":"text","id":"8Otu-1721393831695","leaves":[{"text":"\r","marks":[]}]}]},{"type":"block","id":"7ihg-1721393831698","name":"code-line","data":{},"nodes":[{"type":"text","id":"2sM1-1721393831697","leaves":[{"text":"\t/* 3. 写文件 */\r","marks":[]}]}]},{"type":"block","id":"U0u5-1721393831700","name":"code-line","data":{},"nodes":[{"type":"text","id":"YMzB-1721393831699","leaves":[{"text":"\tif (0 == strcmp(argv[2], \"on\"))\r","marks":[]}]}]},{"type":"block","id":"p1jP-1721393831702","name":"code-line","data":{},"nodes":[{"type":"text","id":"QOof-1721393831701","leaves":[{"text":"\t{\r","marks":[]}]}]},{"type":"block","id":"s9GV-1721393831704","name":"code-line","data":{},"nodes":[{"type":"text","id":"9hd1-1721393831703","leaves":[{"text":"\t\tstatus = 1;\r","marks":[]}]}]},{"type":"block","id":"rLWT-1721393831706","name":"code-line","data":{},"nodes":[{"type":"text","id":"Hura-1721393831705","leaves":[{"text":"\t\twrite(fd, &status, 1);\r","marks":[]}]}]},{"type":"block","id":"XGtN-1721393831708","name":"code-line","data":{},"nodes":[{"type":"text","id":"v2Wl-1721393831707","leaves":[{"text":"\t}\r","marks":[]}]}]},{"type":"block","id":"GNEZ-1721393831710","name":"code-line","data":{},"nodes":[{"type":"text","id":"GtdH-1721393831709","leaves":[{"text":"\telse\r","marks":[]}]}]},{"type":"block","id":"8Jec-1721393831712","name":"code-line","data":{},"nodes":[{"type":"text","id":"eWIs-1721393831711","leaves":[{"text":"\t{\r","marks":[]}]}]},{"type":"block","id":"YMDn-1721393831714","name":"code-line","data":{},"nodes":[{"type":"text","id":"GbXw-1721393831713","leaves":[{"text":"\t\tstatus = 0;\r","marks":[]}]}]},{"type":"block","id":"jo1f-1721393831716","name":"code-line","data":{},"nodes":[{"type":"text","id":"5yrn-1721393831715","leaves":[{"text":"\t\twrite(fd, &status, 0);\r","marks":[]}]}]},{"type":"block","id":"6NtN-1721393831718","name":"code-line","data":{},"nodes":[{"type":"text","id":"RIKy-1721393831717","leaves":[{"text":"\t}\r","marks":[]}]}]},{"type":"block","id":"DGAC-1721393831720","name":"code-line","data":{},"nodes":[{"type":"text","id":"g1op-1721393831719","leaves":[{"text":"\t\r","marks":[]}]}]},{"type":"block","id":"9yBT-1721393831722","name":"code-line","data":{},"nodes":[{"type":"text","id":"4A3H-1721393831721","leaves":[{"text":"\tclose(fd);\r","marks":[]}]}]},{"type":"block","id":"m2LO-1721393831724","name":"code-line","data":{},"nodes":[{"type":"text","id":"j0yO-1721393831723","leaves":[{"text":"\t\r","marks":[]}]}]},{"type":"block","id":"Ee2W-1721393831726","name":"code-line","data":{},"nodes":[{"type":"text","id":"fiZQ-1721393831725","leaves":[{"text":"\treturn 0;\r","marks":[]}]}]},{"type":"block","id":"5e0n-1721393831728","name":"code-line","data":{},"nodes":[{"type":"text","id":"9F5a-1721393831727","leaves":[{"text":"}\r","marks":[]}]}]},{"type":"block","id":"JZj6-1721393831730","name":"code-line","data":{},"nodes":[{"type":"text","id":"LIZs-1721393831729","leaves":[{"text":"\r","marks":[]}]}]},{"type":"block","id":"tEta-1721393831732","name":"code-line","data":{},"nodes":[{"type":"text","id":"9iMj-1721393831731","leaves":[{"text":"\r","marks":[]}]}]},{"type":"block","id":"oyne-1721393831734","name":"code-line","data":{},"nodes":[{"type":"text","id":"V2gt-1721393831733","leaves":[{"text":"","marks":[]}]}]}],"state":{}}]'><div yne-bulb-block="code" data-theme="default" data-language="c">
</div></article>Code language: PHP (php)
Makefile
# 1. 使用不同的开发板内核时, 一定要修改KERN_DIR
# 2. KERN_DIR中的内核要事先配置、编译, 为了能编译内核, 要先设置下列环境变量:
# 2.1 ARCH,          比如: export ARCH=arm64
# 2.2 CROSS_COMPILE, 比如: export CROSS_COMPILE=aarch64-linux-gnu-
# 2.3 PATH,          比如: export PATH=$PATH:/home/book/100ask_roc-rk3399-pc/ToolChain-6.3.1/gcc-linaro-6.3.1-2017.05-x86_64_aarch64-linux-gnu/bin
# 注意: 不同的开发板不同的编译器上述3个环境变量不一定相同,
#       请参考各开发板的高级用户使用手册

KERN_DIR =  /home/book/100ask_imx6ull-sdk/Linux-4.9.88 # 板子所用内核源码的目录

all:
    make -C $(KERN_DIR) M=`pwd` modules
    $(CROSS_COMPILE)gcc -o ledtest ledtest.c

clean:
    make -C $(KERN_DIR) M=`pwd` modules clean
    rm -rf modules.order
    rm -f ledtest

# 参考内核源码drivers/char/ipmi/Makefile
# 要想把a.c, b.c编译成ab.ko, 可以这样指定:
# ab-y := a.o b.o
# obj-m += ab.o

obj-m += leddrv.o

Code language: PHP (php)
上机
注意
复制 100ask_imx6ull-14×14.dtb 到自己要挂载的网络文件系统:
cp arch/arm/boot/dts/100ask_imx6ull-14×14.dtb ~/nfs_rootfs/Study_Li
启动开发板,挂载网络文件系统,复制设备树到boot目录:
cp /mnt/Study_Li/100ask_imx6ull-14×14.dtb /boot/
重启开发板:
reboot
挂载系统,安装驱动,列出节点(ls /dev/100ask_led0),执行程序(./ledtest /dev/100ask_led0 on/off)
cp arch/arm/boot/dts/100ask_imx6ull-14×14.dtb ~/nfs_rootfs/Study_Li
启动开发板,挂载网络文件系统,复制设备树到boot目录:
cp /mnt/Study_Li/100ask_imx6ull-14×14.dtb /boot/
重启开发板:
reboot
挂载系统,安装驱动,列出节点(ls /dev/100ask_led0),执行程序(./ledtest /dev/100ask_led0 on/off)


评论