

字符设备通用驱动程序框架
对应视频P10
编写驱动程序的步骤
- 确定主设备号,也可以让内核分配
- 构造 file_operations 结构体
- 在里面填充open/read/write/ioctl成员
- 注册file_operations结构体
- int major = register_chrdev(0, “name”, &fops);
- 入口函数:调用 regiister_chrdev
- 出口函数:调用 unregiister_chrdev
- 辅助信息:
- class_create/class_destroy
- device_create/device_destroy
编写简单Hello驱动程序
测试环境
- VSCode+Ubuntu(远程)
- 交叉编译链arm-buildroot-linux-gnueabihf-
程序结构

驱动
#include <linux/mm.h>
#include <linux/module.h>
#include <linux/miscdevice.h>
#include <linux/slab.h>
#include <linux/vmalloc.h>
#include <linux/mman.h>
#include <linux/random.h>
#include <linux/init.h>
#include <linux/raw.h>
#include <linux/tty.h>
#include <linux/capability.h>
#include <linux/ptrace.h>
#include <linux/device.h>
#include <linux/highmem.h>
#include <linux/backing-dev.h>
#include <linux/shmem_fs.h>
#include <linux/splice.h>
#include <linux/pfn.h>
#include <linux/export.h>
#include <linux/io.h>
#include <linux/uio.h>

#include <linux/uaccess.h>

static int major;  //主设备号

/**
 * hello_open - 文件打开操作的回调函数
 * @node: 节点对象,指向对应的文件系统节点
 * @filp: 文件对象,用于后续的文件操作
 *
 * 该函数在用户尝试打开对应的文件时被调用。
 * 主要用于演示或调试目的,这里它只是简单地打印出当前文件、函数名和行号。
 * 返回0,表示文件打开操作成功。
 */
static int hello_open(struct inode *node, struct file *filp)
{
    printk("%s %s %d\n", __FILE__, __FUNCTION__, __LINE__);
    return 0;
}
/**
 * hello_read - 一个示例读取函数
 * @filp: 文件结构体指针,用于操作文件
 * @buf: 用户空间的缓冲区指针,数据将被读入此缓冲区
 * @size: 指定要读取的字节数
 * @offset: 文件偏移量指针,指示接下来读取的位置
 *
 * 这个函数的目的是演示如何实现一个文件的读取操作。
 * 在这个例子中,函数简单地打印当前文件名、函数名和行号,
 * 然后返回指定的读取大小。这并不是一个实际的读取操作,
 * 但是展示了如何与内核空间和用户空间交互。
 *
 * 返回: 调用者指定的读取大小
 */
static ssize_t hello_read(struct file *filp, char __user *buf, size_t size, loff_t *offset)
{
    printk("%s %s %d\n", __FILE__, __FUNCTION__, __LINE__);
    return size;
}

/**
 * hello_write - 一个示例写函数
 * @filp: 文件结构体指针,代表打开的文件
 * @buf: 用户空间的缓冲区指针,包含要写入的数据
 * @size: 要写入的数据大小
 * @offset: 文件偏移量,指示写入位置
 *
 * 这个函数的目的是演示如何在内核模块中实现一个写函数。
 * 它当前的实现只是简单地打印出调用的文件名、函数名和行号,
 * 然后返回指定的大小,表示所有数据都已被“写入”。
 *
 * 返回: 要写入的字节数,这里直接返回传入的size。
 */
static ssize_t hello_write(struct file *filp, const char __user *buf, size_t size, loff_t *offset)
{
    printk("%s %s %d\n", __FILE__, __FUNCTION__, __LINE__);
    return size;
}

/**
 * hello_release - 文件释放操作函数
 * @node: 节点指针,代表文件系统中的一个节点
 * @filp: 文件指针,代表打开的文件
 *
 * 该函数在文件被关闭时被调用。它的主要作用是打印当前文件、函数名和行号,
 * 用于调试和日志记录。返回0表示释放操作成功。
 */
static int hello_release(struct inode *node, struct file *filp)
{
    printk("%s %s %d\n", __FILE__, __FUNCTION__, __LINE__);
    return 0;
}

/* 1. create file_operations */
/* 定义了一个静态常量结构体file_operations,用于描述设备文件的操作接口 */
// 应用程序可以通过标准的文件I/O系统调用来访问这个设备文件,如open、read、write和close等。当应用程序调用这些系统调用时,内核会找到与设备文件关联的file_operations结构体,并调用相应的函数。
static const struct file_operations hello_drv = {
    .owner = THIS_MODULE,  /* 指定模块所有者,用于权限管理 */
    .read = hello_read,    /* 指向read函数,实现从设备文件读数据的功能 */
    .write = hello_write,  /* 指向write函数,实现向设备文件写数据的功能 */
    .open = hello_open,    /* 指向open函数,实现设备文件的打开操作 */
    .release = hello_release  /* 指向release函数,实现设备文件的释放操作 */
};

/* 2. register_chrdev */

/* 3. entry function */
/**
 * hello_init - 初始化Hello设备驱动程序
 *
 * 该函数负责为Hello设备驱动程序注册一个字符设备。它通过调用register_chrdev函数来实现,
 * 并将设备号、设备名称和设备操作函数指针传递给register_chrdev函数。
 *
 * @return: 返回0,表示初始化成功。这里的返回值被硬编码为0,是因为在这个示例中,
 *          我们不处理错误情况。在实际的设备驱动程序中,应该根据register_chrdev的返回值
 *          来决定是否返回错误码。
 */
static int hello_init(void)
{
    /* 注册字符设备,设备主号为0,设备名"100ask_hello",设备操作函数指针为hello_drv */
    // 一旦设备注册完成,通常会在/dev目录下创建一个设备文件,例如/dev/100ask_hello。
    major = register_chrdev(0, "100ask_hello", &hello_drv);
    return 0;
}

/* 4. exit function */
static void hello_exit(void)
{
    unregister_chrdev(major, "100ask_hello");
}

/* 在模块加载时执行初始化操作 */
module_init(hello_init);

/* 在模块卸载时执行清理操作 */
module_exit(hello_exit);

/* 声明模块使用GPL许可证 */
MODULE_LICENSE("GPL");
Code language: PHP (php)
应用
//open
#include <sys/types.h>
#include <sys/stat.h>
#include <fcntl.h>

//write read close
#include <unistd.h>

//printf
#include <stdio.h>

//strlen
#include <string.h>

/* 用法:
      写: ./hello_test /dev/xxx 100ask
      读: ./hello_test /dev/xxx
   注释:
        ./hello_test: 执行程序
        /dev/xxx:设备文件名
        argc: 参数个数(包括程序名称自身)
        argv: 参数数组(指向字符串的指针数组)=**argv,每个元素都是一个指向命令行参数的指针
*/

int main(int argc,char *argv[])
{
    int fd;  //文件描述符
    int len; //数据长度
    char buf[100]; //读写数据缓冲区

    if(argc < 2)//参数个数小于2
    {
        printf("Usage: \n");                     //提示用法
        printf("%s <dev> [string]\n", argv[0]);  // %s:表示程序名字 <dev>:表示设备文件名(必填) [string]:表示要写入的数据(选填)
        return -1;
    }
    //open
    fd = open(argv[1], O_RDWR); // 打开设备文件, O_RDWR: 读写模式
    if(fd < 0) // 打开失败
    {
        printf("open %s failed!\n", argv[1]);
        return -1;
    }

    //write
    if(argc == 3)
    {
        //write
        len = write(fd, argv[2], strlen(argv[2]) + 1); // 写入数据,strlen: 计算字符串长度,+1:计算字符串长度+1,因为字符串结尾需要加'\0'
        printf("write %d bytes\n", len);
    }
    else
    {
        //read
        len = read(fd, buf, 100);  // 读数据
        buf[99]='\0'; // 字符串结尾需要加'\0'
    }

    //close
    close(fd);
    return 0;
}Code language: PHP (php)
Makefile
KERN_DIR = /home/book/100ask_imx6ull-sdk/Linux-4.9.88  # 修改成你的Linux源码目录

# 编译
# make -C: 进入Linux源码目录   $(KERN_DIR): M=`pwd`: 当前目录   modules:模块
# $(CROSS_COMPILE)gcc: 编译hello_drv_test.c
all:
    make -C $(KERN_DIR) M=`pwd` modules
    $(CROSS_COMPILE)gcc -o hello_test hello_test.c

# 清理
# rm -rf modules.order:删除模块依赖关系文件
# rm -f hello_drv_test:删除hello_drv_test.c编译生成的可执行文件
clean:
    make -C $(KERN_DIR) M=`pwd` modules clean
    rm -rf modules.order
    rm -f hello_test

# obj-m:模块文件
# hello_drv.o: 模块文件
obj-m    += hello_drv.oCode language: PHP (php)
驱动程序自动获得主次设备号
修改hello_drv.c
视频对应P21节的内容,主要修改的地方是hello_init和hello_exit的位置,代码里面有注释
#include <linux/mm.h>
#include <linux/module.h>
#include <linux/miscdevice.h>
#include <linux/slab.h>
#include <linux/vmalloc.h>
#include <linux/mman.h>
#include <linux/random.h>
#include <linux/init.h>
#include <linux/raw.h>
#include <linux/tty.h>
#include <linux/capability.h>
#include <linux/ptrace.h>
#include <linux/device.h>
#include <linux/highmem.h>
#include <linux/backing-dev.h>
#include <linux/shmem_fs.h>
#include <linux/splice.h>
#include <linux/pfn.h>
#include <linux/export.h>
#include <linux/io.h>
#include <linux/uio.h>
#include <linux/uaccess.h>
static dev_t dev;
static unsigned char hello_buf[100]; //存储数据
static struct class *hello_class; //类对象:用于创建设备节点
static struct cdev hello_cdev; //cdev对象
/**
* hello_open - 文件打开操作的回调函数
* @node: 节点对象,指向对应的文件系统节点
* @filp: 文件对象,用于后续的文件操作
*
* 该函数在用户尝试打开对应的文件时被调用。
* 主要用于演示或调试目的,这里它只是简单地打印出当前文件、函数名和行号。
* 返回0,表示文件打开操作成功。
*/
static int hello_open(struct inode *node, struct file *filp)
{
printk("%s %s %d\n", __FILE__, __FUNCTION__, __LINE__);
return 0;
}
/**
* hello_read - 一个示例读取函数
* @filp: 文件结构体指针,用于操作文件
* @buf: 用户空间的缓冲区指针,数据将被读入此缓冲区
* @size: 指定要读取的字节数
* @offset: 文件偏移量指针,指示接下来读取的位置
*
* 这个函数的目的是演示如何实现一个文件的读取操作。
* 在这个例子中,函数简单地打印当前文件名、函数名和行号,
* 然后返回指定的读取大小。这并不是一个实际的读取操作,
* 但是展示了如何与内核空间和用户空间交互。
*
* 返回: 调用者指定的读取大小
*/
static ssize_t hello_read(struct file *filp, char __user *buf, size_t size, loff_t *offset)
{
unsigned long len = size > 100 ? 100 : size; // 读取长度 long:64位,提供更大的数值范围
printk("%s %s %d\n", __FILE__, __FUNCTION__, __LINE__);
if (copy_to_user(buf, hello_buf, len))
{
printk(KERN_ERR "向用户空间复制数据失败\n");
return -EFAULT;
}
return len;
}
/**
* hello_write - 一个示例写函数
* @filp: 文件结构体指针,代表打开的文件
* @buf: 用户空间的缓冲区指针,包含要写入的数据
* @size: 要写入的数据大小
* @offset: 文件偏移量,指示写入位置
*
* 这个函数的目的是演示如何在内核模块中实现一个写函数。
* 它当前的实现只是简单地打印出调用的文件名、函数名和行号,
* 然后返回指定的大小,表示所有数据都已被“写入”。
*
* 返回: 要写入的字节数,这里直接返回传入的size。
*/
static ssize_t hello_write(struct file *filp, const char __user *buf, size_t size, loff_t *offset)
{
unsigned long len = size > 100 ? 100 : size;
printk("%s %s %d\n", __FILE__, __FUNCTION__, __LINE__);
if (copy_from_user(hello_buf, buf, len)) {
printk(KERN_ERR "从用户空间复制数据失败\n");
return -EFAULT;
}
return len;
}
/**
* hello_release - 文件释放操作函数
* @node: 节点指针,代表文件系统中的一个节点
* @filp: 文件指针,代表打开的文件
*
* 该函数在文件被关闭时被调用。它的主要作用是打印当前文件、函数名和行号,
* 用于调试和日志记录。返回0表示释放操作成功。
*/
static int hello_release(struct inode *node, struct file *filp)
{
printk("%s %s %d\n", __FILE__, __FUNCTION__, __LINE__);
return 0;
}
/* 1. create file_operations */
/* 定义了一个静态常量结构体file_operations,用于描述设备文件的操作接口 */
// 应用程序可以通过标准的文件I/O系统调用来访问这个设备文件,如open、read、write和close等。当应用程序调用这些系统调用时,内核会找到与设备文件关联的file_operations结构体,并调用相应的函数。
static const struct file_operations hello_drv = {
.owner = THIS_MODULE, /* 指定模块所有者,用于权限管理 */
.read = hello_read, /* 指向read函数,实现从设备文件读数据的功能 */
.write = hello_write, /* 指向write函数,实现向设备文件写数据的功能 */
.open = hello_open, /* 指向open函数,实现设备文件的打开操作 */
.release = hello_release /* 指向release函数,实现设备文件的释放操作 */
};
/* 2. register_chrdev */
/* 3. entry function */
/**
* hello_init - 初始化Hello设备驱动程序
*
* 该函数负责为Hello设备驱动程序注册一个字符设备。它通过调用register_chrdev函数来实现,
* 并将设备号、设备名称和设备操作函数指针传递给register_chrdev函数。
*
* @return: 返回0,表示初始化成功。这里的返回值被硬编码为0,是因为在这个示例中,
* 我们不处理错误情况。在实际的设备驱动程序中,应该根据register_chrdev的返回值
* 来决定是否返回错误码。
*/
static int hello_init(void)
{
int ret;
ret = alloc_chrdev_region(&dev, 0, 1, "hello"); // 注册字符设备
if(ret<0)
{
printk(KERN_ERR "alloc_chrdev_region() failed for hello\n"); // 打印错误信息
return -EINVAL; // 返回错误码
}
cdev_init(&hello_cdev, &hello_drv); // 初始化cdev对象
ret = cdev_add(&hello_cdev, dev, 1); // 添加cdev对象
if(ret)
{
printk(KERN_ERR "cdev_add() failed for hello\n"); // 打印错误信息
return -EINVAL; // 返回错误码
}
hello_class = class_create(THIS_MODULE, "hello_class"); // 创建类对象,在/sys/class/hello_class/hello
if(IS_ERR(hello_class)) // 判断是否创建成功
{
printk("failed to allocate class\n ");
return PTR_ERR(hello_class); // 返回错误码
}
device_create(hello_class, NULL, dev, NULL, "hello"); // 创建设备节点
return 0;
}
/* 4. exit function */
static void hello_exit(void)
{
device_destroy(hello_class,dev); // 删除设备节点
class_destroy(hello_class); // 删除类对象
cdev_del(&hello_cdev); // 删除cdev对象
unregister_chrdev_region(dev, 1); // 卸载字符设备
// unregister_chrdev(major, "100ask_hello"); // 卸载字符设备
}
/* 在模块加载时执行初始化操作 */
module_init(hello_init);
/* 在模块卸载时执行清理操作 */
module_exit(hello_exit);
/* 声明模块使用GPL许可证 */
MODULE_LICENSE("GPL");
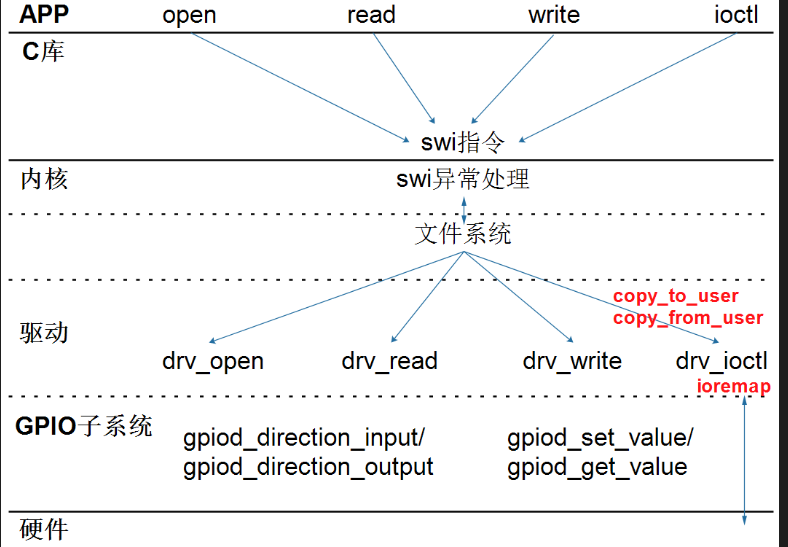
Code language: HTML, XML (xml)APP和驱动的交互方式
传输数据
APP和驱动:
这里的代码在上面驱动部分相应的hello_read,hello_write函数里面修改。
- copy_to_user //驱动拷贝数据到用户空间
- copy_from_user //从用户空间拷贝数据到驱动
copy_to_user
static ssize_t hello_read(struct file *filp, char __user *buf, size_t size, loff_t *offset)
{
    unsigned long len = size > 100 ? 100 : size; // 读取长度 long:64位,提供更大的数值范围

    printk("%s %s %d\n", __FILE__, __FUNCTION__, __LINE__);

    if (copy_to_user(buf, hello_buf, len))
    {
        printk(KERN_ERR "向用户空间复制数据失败\n");
        return -EFAULT;
    }

    return len;
}Code language: PHP (php)
copy_from_user
static ssize_t hello_write(struct file *filp, const char __user *buf, size_t size, loff_t *offset)
{
    unsigned long len = size > 100 ? 100 : size;

    printk("%s %s %d\n", __FILE__, __FUNCTION__, __LINE__);

    if (copy_from_user(hello_buf, buf, len)) {
        printk(KERN_ERR "从用户空间复制数据失败\n");
        return -EFAULT;
    }

    return len;
}

Code language: PHP (php)
编译,开发板挂载文件系统,复制文件,装载驱动,执行

驱动和硬件:
- 各个 子系统的函数
- 通过 ioremap 映射寄存器地址后,直接访问寄存器
APP使用驱动的4种方式
驱动程序:提供能力,不提供策略
- 非阻塞(查询)
- 阻塞(休眠-唤醒)
- poll(定个闹钟)
- 异步通知

妈妈怎么知道卧室里小孩醒了?
- 查询方式:时不时进房间看一下
- 简单,但是累
- 休眠-唤醒:进去房间陪小孩一起睡觉,小孩醒了会吵醒她
- 不累,但是妈妈干不了活了
- poll 方式:妈妈要干很多活,但是可以陪小孩睡一会,定个闹钟
- 要浪费点时间, 但是可以继续干活。
- 妈妈要么是被小孩吵醒,要么是被闹钟吵醒。
- 异步通知:妈妈在客厅干活,小孩醒了他会自己走出房门告诉妈妈:
- 妈妈、小孩互不耽误
通用框架1_最简单
GPIO子系统
引脚编号
在硬件上如何确定GPIO引脚?它属于哪组GPIO?它是这组GPIO里的哪个引脚?需要2个参数。
但是在Linux软件上,可以使用引脚编号来表示。
在开发板上执行如下命令查看已经在使用的GPIO状态:
# cat /sys/kernel/debug/gpio

gpiochip0: GPIOs 0-15, parent: platform/soc:pin-controller@50002000, GPIOA:
 gpio-10  (                    |heartbeat           ) out lo
 gpio-14  (                    |shutdown            ) out hi

gpiochip1: GPIOs 16-31, parent: platform/soc:pin-controller@50002000, GPIOB:
 gpio-26  (                    |reset               ) out hi ACTIVE LOW

gpiochip2: GPIOs 32-47, parent: platform/soc:pin-controller@50002000, GPIOC:

gpiochip3: GPIOs 48-63, parent: platform/soc:pin-controller@50002000, GPIOD:Code language: PHP (php)
可以看到:在Linux系统中可以使用编号来访问某个GPIO。
怎么确定GPIO引脚的编号?方法如下:
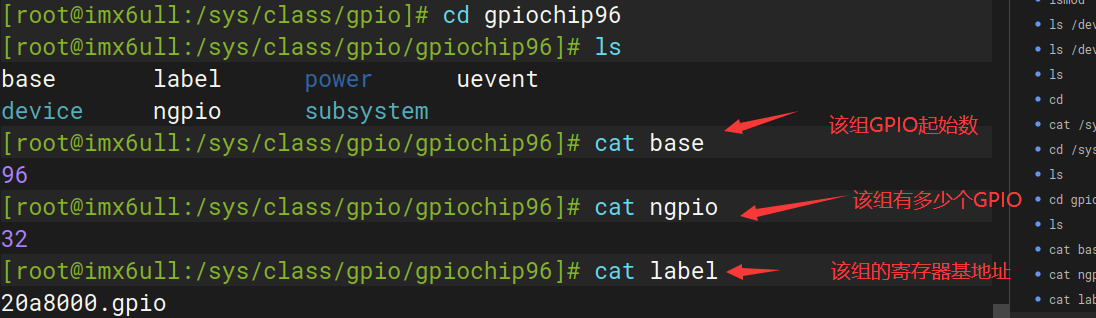
①在开发板的/sys/class/gpio目录下,找到各个gpiochipXXX目录:
这里gpiochip128后面的数字代表基数

②然后进入某个gpiochipXXX目录,查看文件label的内容,就可以知道起始号码XXX对于哪组GPIO
实例-KEY
以100ask_imx6ull为例,它有一个按键,原理图如下:
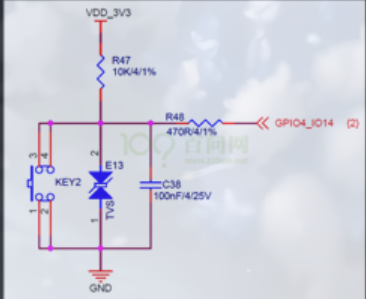
注意:这里的GPIO4对应gpiochip3,即第三组GPIO;
读取按键值:
那么GPIO4_14的号码是96(第三组GPIO的基数)+14(IO14)= 110,可以在100ask_imx6ull开发板上如下
[root@100ask:~]# echo 110 > /sys/class/gpio/export              // gpio_request
[root@100ask:~]# echo in > /sys/class/gpio/gpio110/direction    // gpio_direction_input
[root@100ask:~]# cat /sys/class/gpio/gpio110/value              // gpio_get_value
[root@100ask:~]# echo 110 > /sys/class/gpio/unexport            // gpio_freeCode language: PHP (php)
设置输出引脚
对于输出引脚,假设引脚号为N,可以用下面的方法设置它的值为1:
[root@100ask:~]# echo N > /sys/class/gpio/export
[root@100ask:~]# echo out > /sys/class/gpio/gpioN/direction
[root@100ask:~]# echo 1 > /sys/class/gpio/gpioN/value
[root@100ask:~]# echo N > /sys/class/gpio/unexportCode language: PHP (php)
GPIO子系统的函数
GPIO子系统函数有新、老两套:
| descriptor-based(旧) | legacy(新) |
| 获得GPIO | |
| gpiod_get | gpio_request |
| gpiod_get_index | |
| gpiod_get_array | gpio_request_array |
| devm_gpiod_get | |
| devm_gpiod_get_index | |
| devm_gpiod_get_array | |
| 设置方向 | |
| gpiod_direction_input | gpio_direction_input |
| gpiod_direction_output | gpio_direction_output |
| 读值、写值 | |
| gpiod_get_value | gpio_get_value |
| gpiod_set_value | gpio_set_value |
| 释放GPIO | |
| gpio_free | gpio_free |
| gpiod_put | gpio_free_array |
| gpiod_put_array | |
| devm_gpiod_put | |
| devm_gpiod_put_array |
中断函数
在驱动程序里使用中断的流程如下:
- 确定中断号
- 注册中断处理函数,函数原型如下:
函数在 Linux 内核中用于请求并注册一个硬件中断处理程序。
int request_irq(unsigned int irq, irq_handler_t handler, unsigned long flags,
        const char *name, void *dev);

Code language: JavaScript (javascript)- 在中断处理函数里
- 分辨中断
- 处理中断
- 清除中断
函数细节
unsigned int irq: 是中断号,这是中断请求线(IRQ)的编号,表示你想要监听的特定硬件中断。每个硬件设备可能连接到不同的 IRQ 上,因此你需要知道确切的 IRQ 编号来注册正确的中断处理程序。可以根据GPIO函数获得中断号:
int gpio_to_irq(unsigned int gpio);
int gpiod_to_irq(const struct gpio_desc *desc);Code language: JavaScript (javascript)
irq_handler_t handler: 是函数指针:这是一个指向中断服务例程(ISR)的指针,即当发生中断时将被调用的函数。中断服务例程通常需要快速执行以响应中断,并且通常会做最小的处理工作,如保存状态或调度更复杂的任务处理。
enum irqreturn {
    IRQ_NONE        = (0 << 0),
    IRQ_HANDLED        = (1 << 0),
    IRQ_WAKE_THREAD        = (1 << 1),
};
typedef enum irqreturn irqreturn_t;
typedef irqreturn_t (*irq_handler_t)(int irq, void *dev);Code language: JavaScript (javascript)
unsigned long flags::有如下取值:是一组标志位,用于控制中断处理程序的行为
#define IRQF_TRIGGER_NONE    0x00000000
#define IRQF_TRIGGER_RISING    0x00000001
#define IRQF_TRIGGER_FALLING    0x00000002
#define IRQF_TRIGGER_HIGH    0x00000004
#define IRQF_TRIGGER_LOW    0x00000008

#define IRQF_SHARED        0x00000080Code language: CSS (css)
const char *name: :是中断的名字,可以在执行cat /proc/interrupts的结果里查看。这是一个字符串,用于标识中断处理程序。这通常用于调试和日志记录,帮助内核开发人员跟踪哪个设备或驱动程序与特定的中断相关联。
void *de:是给中断处理函数使用的。这是一个指向设备结构的指针,通常是指向与中断相关的设备的
struct device 或者其他相关结构体。


博主真的好棒,我是杭电研一通信的学生,我也在跟着韦东山老师学Linux,很高兴能看到你的博客!
谢谢哦,前段时间忙着本科毕业论文去了,现在才上线看到消息,韦老师的linux深入浅出,讲的非常好,跟着他学没有问题的